
Cloning for all #1 - Gibson Assembly
Published:
In the first #CloningForEveryone session we will look at Gibson Assembly, which in my opinion is the most worthwhile to learn because it will let you clone almost anything. And once you know the secret to it, it’s as easy as restriction cloning.
This “blog” post was written after the original twitter thread. I just wanted to thank everyone who read it, shared it, and commented on it. When I wrote it I genuinely thought only a handful of people would see it. And wow was I wrong. There are few things in science more rewarding than knowing you might have helped another scientist. Thank you for brightening up my day! Hope you found it helpful in some way.
How does Gibson assembly work?
The goal of these posts is not to bog you down in detail, but I think it is helpful to understand the principle of Gibson assembly. People familiar with restriction cloning know that it works by creating single stranded DNA (overhangs) by cutting with restriction enzymes, by creating complementary overhangs between two pieces of DNA these can anneal and be ligated together. Gibson assembly does the same thing, except that instead of relying on restriction sites to create overhangs it requires homologous DNA sequences (incorporated by PCR) between the backbone and the insert. This homology is double stranded, what happens next?
- exonuclease chews back 5’ -> 3’ leaving an exposed 3’ overhang, this happens on both pieces leaving complementary overhangs that can anneal
- unlike in restriction cloning the overhangs can be different lengths so a polymerase in the mix fills in the gaps
- once the gaps are filled the DNA is ligated
For those interested in more detail here is a link to the original Gibson assembly paper and here is the NEB product information.
When to use Gibson Assembly
Gibson assembly can replace restriction cloning, especially when there are no convenient restriction sites in your vector or insert. In addition it can be used to assemble plasmids from multiple fragments (I’ve never had to use it for more than 6, but there are plenty of reports it can do more). Gibson assembly creates seamless assemblies, i.e. you are not limited by having the restriction site between fragments when you bring them together.
When to avoid Gibson Assembly
Gibson requires PCR to add homology to either the insert, vector, or both. If you are limited to a region that is very repetitive or GC rich and can’t produce clean PCR products it will hurt efficiency (but it can still work). Additionally, and this took a lot of pain to learn, Gibson fails when the pieces you are trying to assemble are very similar to each other. For example many CRISPR-screens are now using dual sgRNAs, these are usually created by having two U6 promoter + sgRNA + scaffold, even if you PCR on unique 20-30mers on the end of these U6-guide blocks the sequence inbetween is similar and efficiency takes a massive hit. To assemble these kinds of plasmids I recommend Golden Gate (which will be next week’s topic).
Planning your cloning
Clarification, throughout this post I will be calling it Gibson assembly, because that’s what it was originally called. But I use the NEB Hifi DNA assembly mastermix which is an optimized set of enzymes compared to the original Gibson assemblies.
There are a lot of tools out there for Gibson cloning design. They are confusing to me. Gibson is incredibly flexible and so my suggestion is to design the plasmid you want, and the cloning will work.
I’m going to walk you through a theoretical cloning project. I picked this example because there are no convenient restriction sites and this would be a nightmare to do with traditional restriction cloning.
Goal: Move Cas9 from pX458 to a lentivirus backbone. But because we are space concious let’s remove the SV40 promoter from Puro and connect the Cas9 to Puro with the T2A that currently connects it to GFP. I’ve highlighted the region of pX458 we will be taking Cas9 from, and the promoter region we will be removing from pLenti.

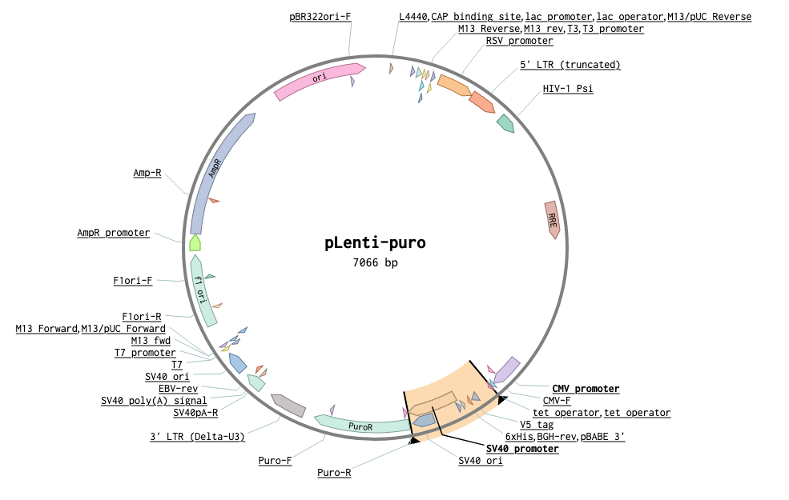
Instead of juggling pieces of DNA around a word document, I like to just create the new plasmid map directly. To start, copy the receiving vector sequence into a new file (all these sequence images are from benchling which is what I use for all my cloning planning, for images showing up with low resolution you can right-click + open in new tab, apologies I can clone but I can’t figure out GitHub pages).
I’ve zoomed in on the region where we will be making a deletion from the vector. We don’t want the tet operators so we will remove everything from the end of CMV to the start of puro. Translate the protein coding regions to make sure you won’t be knocking it out of frame.
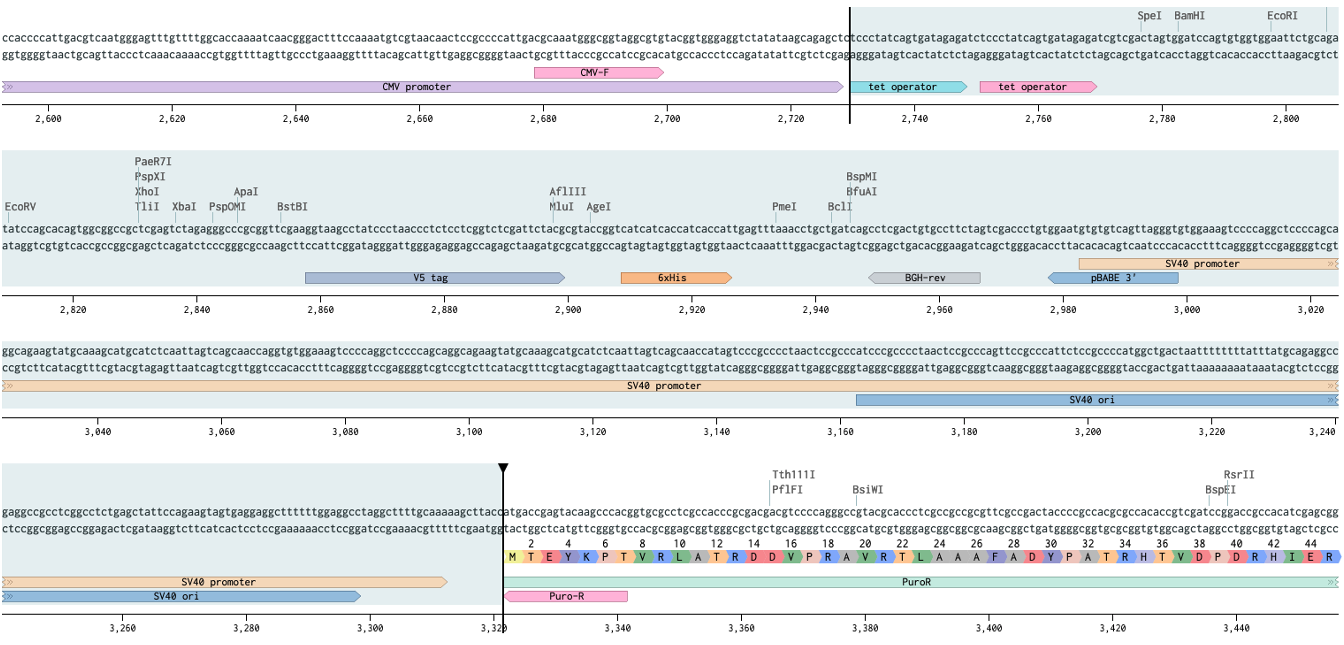
It’s helpful when making deletions to add dummy bases to keep track of where it happened, this helps line up the homology arms later. I add 3W’s.

Next we figure out where Cas9 should start and stop.
ProTip™ Kozak sequence, named after Marilyn Kozak, is very important for translation. The minimum sequence is CCACCATG where ATG is the start codon. Here we have a more complete version (highlighted GCCACCATGG).
Notice how the Flag annotation starts on an aspartate (D). If you had copied just from the Flag you would have missed the start codon. Let’s start Cas9 before the kozak sequence (vertical bar).
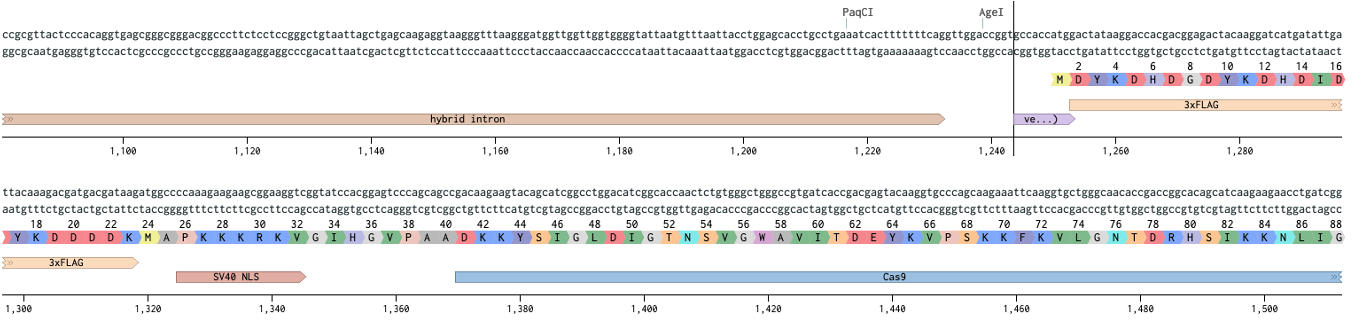
As for where to end, lets grab to the end of the T2A and keep it all in frame.

Now we paste Cas9+T2A in the place of the 3W’s, and annotate this entire integration so that we can design homology arms later. This is especially important when introducing multiple pieces. Which would be done the same way we did here, pick the pieces and copy paste them into the receiving vector.

Designing primers
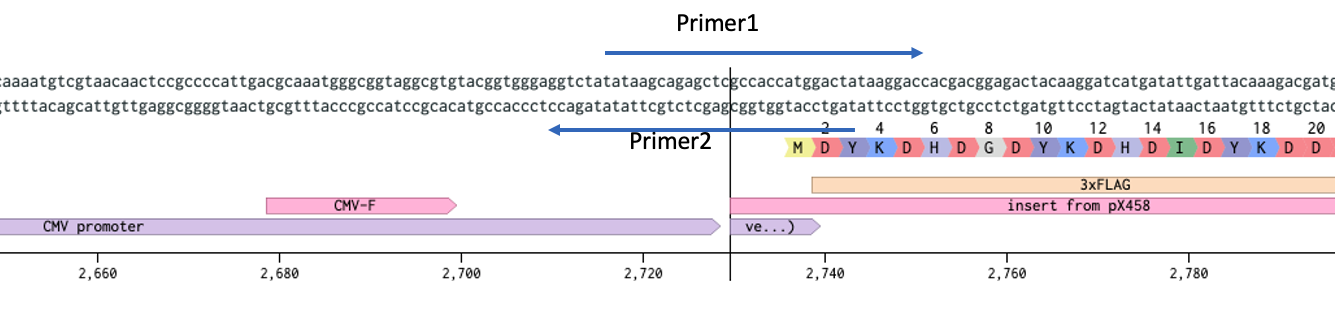
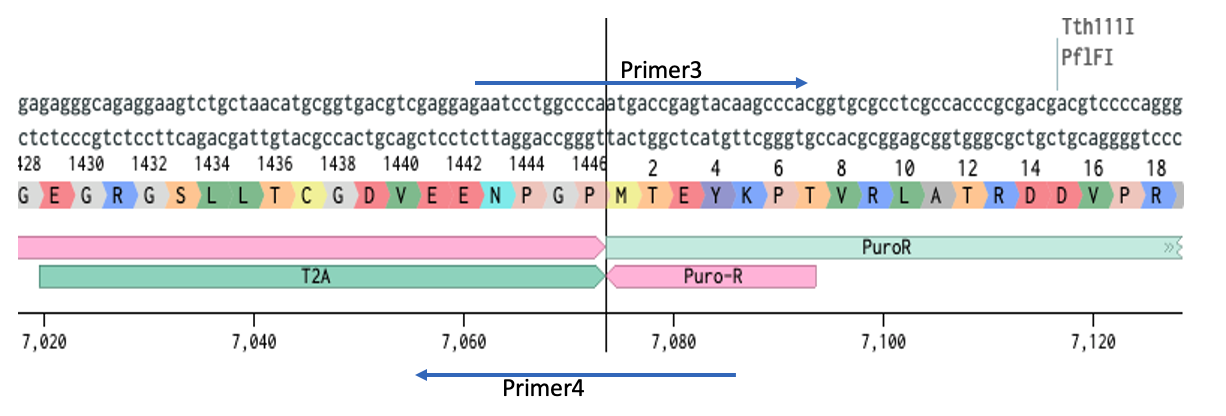
The next step is to design primers that add homology between the insert and the vector. Here’s the 5’ seam. We want two primers at this seam.
- Primer1 amplifying our insert and adding the homology to the backbone
- Primer2 going the opposite way, amplifying our backbone. (primers not drawn to scale)
ProTip™ here is a very easy way to get 30-40bp of homology. You don’t actually need to add 30 bp of homology to one primer you can add 15bp to each. Primer1 has 15bp to the backbone, primer2 has 15bp to the insert.
ProTip™ on primer Tms. I used to take great care in designing primers for cloning, then I switched to NEB Q5 and found that as long as the Tm is 72C, and the primer ends in Gs or Cs, it works. NEB Tm Calculator
The 72C should include ONLY the area of your template. i.e. Primer1 the sequence the covers the insert should be 72C (ignore the temp of the homology arm) Primer2 look only at the sequence of the CMV promoter not the homology to the insert.
We do the same at the other end.
Create the fragments
Now we set up the two PCR reactions:
- 10ng pX458 + Primer1 + Primer4 = Cas9 with homology
- 10ng pLenti + Primer2 + Primer3 = pLenti vector with homology I use a 50ul rxn, 30ul would be fine, I wouldn’t go lower than that.
From a distance I can hear the weathered molecular biologist saying, “PCRing a region as large as the vector is a bad idea”. But I have plenty of evidence that it’s not that bad. The secret is to not do it the traditional way. How?
- Q5 has amazing error correcting abilities
- The secret is to minimize the number of cycles
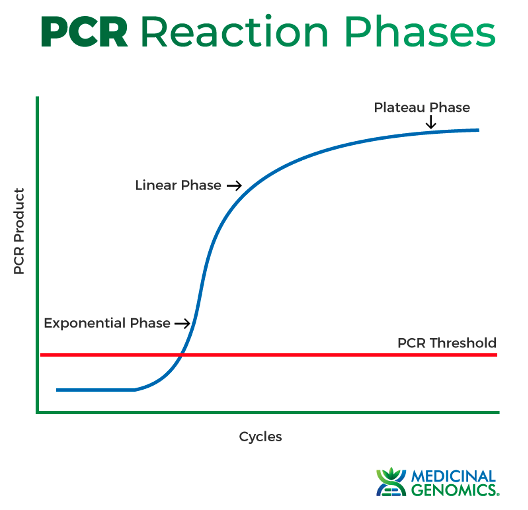
Here is the real tip that most people don’t know about. You can clone in a real-time PCR machine (mind blown gif). It will tell you when you have enough product and prevent you from over-amplifying.
How do I do it? We purchased SybrGreen from Thermo Fisher, and spike it into our PCRs. Now we can monitor our product as it is made. And we can stop it just before it enters the linear phase.
I know everyone has concerns about this, does the intercalation affect downstream steps? My answer, it makes sense, so maybe? but 99% of my colonies are 100% error-free, so it’s fixing much more error than it’s creating.
To fully take advantage of this approach set up your PCR protocol as some version of the following:
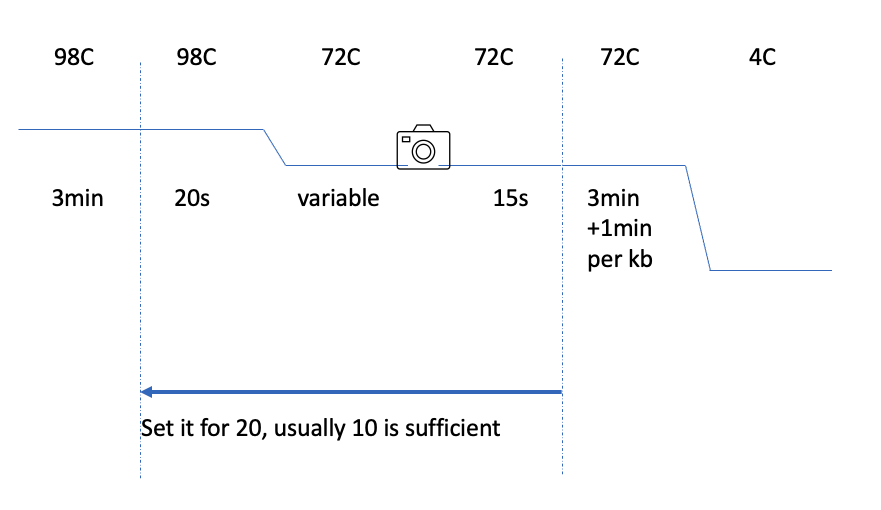
The 15 seconds of grace period between the imaging and jumping back to denaturing (98C) gives you a chance to skip out of the cycling (most biorad PCR machines allow this).
We designed the Tms to be 72C. So there’s no need to think much about Tms.
The elongation time is also relatively simple:
- 1min for <1kb then add 1min per kb.
- If you go above 8kb in min = (kb+2min) e.g. 8kb is 10min.
- If you have a few fragments ranging from small to 3kb you can set them all at the elongation time for 3kb. But, it’s worthwhile to know that small fragments PCR more efficiently than larger fragments. So if running in the same machine together:
- add a little more template for the longer fragments
- put the fragments in as individual tubes, as they are read pause the machine at the 72C step after image, open lid, remove tubes that are done, close, and unpause run
Purify the fragments
We put in a lot of template. If you dont remove it you will end up with background colonies that are useless to you.
I was taught, and I swear by, gel purification:
- Use a 0.7-1% gel, and give it time to separate well.
- Please don’t stick the gel in a gel doc imager or gel box with high-energy UV. It damages the DNA creating thymidine dimers. Use low-energy UV or blue-light.
- Using a SHARP razor blade cut out as small a fragment as possible (I aim for less than 0.1g).
- We use the NEB monarch kit to gel extract.
Alternatively if you are in a rush. DpnI is a restriction enzyme that cuts only methylated DNA. Bacteria methylate the plasmids they make. Your PCR machine does not methyalate your PCR products. So only the plasmid will be destroyed. It works, I found it less efficient so I don’t use it. But it’s faster. Everything has pros and cons.
Setting up the reaction
You’ve got all the pieces you need to follow the Hifi protocol!
As many twitter users pointed out, the HiFi kit isn’t free.
- For the less experienced user I liked @ProfCamenares suggestion of just reducing volumes. HiFi/Gibson is incredibly efficient, a half or third reaction will give you plenty of material for your transformation. Pipet a volume you are comfortable with.
- There we some suggestions and literature for alternative formulations or homebrew recipes that are cheaper, if you are confident in your skills I fully support them. As I mention later, keep in mind HiFi isn’t just marked up enzyme, there are other enzymes in it that add functionality.
What about not PCRing the backbone?
I don’t want to go into all the details of how to gibson without amplifying the backbone right now. The advantage is that you don’t have to worry about sequencing the backbone. The basic idea is the same as what we did above. You copy the acceptor vector map, you mimic the digestion and remove the sequence between the restriction sites (you can reconstitute the restriction sites or remove them). You copy paste the insert(s). And design primers only for the insert adding 20bp of homology to the vector or between the inserts. Then you digest the vector (don’t alkaline phosphatase it), PCR the inserts, gel purify or DpnI, gibson away.
Thanks for reading through, I hope you found at least something of use here. Let me know if there was too much/little explaining of some steps. This post was longer than I intended it to be, too many things to mention. In the future I will try to keep them more focused since you will already know many of my secrets common to all cloning projects.
Next week, Golden Gate or: How I Learned To Stop Worrying About How Many Fragments I Was Shoving Into a Plasmid.
Original Twitter thread
In an attempt to pay-forward all the cloning advice I’ve been given here’s the start of #CloningForAll. Today we start with the biggest bang for your buck. Gibson Assembly (GA). Along the way tips and tricks. 1/n
— Francesco Emiliani (@fe_emiliani) April 8, 2022
Contains a lot of useful comments from people who share their techniques and also literature on cheaper alternatives to Gibson. Keep in mind that the NEB HiFi kit contains multiple enzymes to increase efficiency and also functionality so while these alternative reagents work for generic Gibson they might not work for all applications that NEB lists their HiFi kit can be used for. Refer to the literature to determine what you should and shouldn’t use them for.
Special thanks to @darachm for TEDA cloning, @M_Crone for CPEC, @ProfBootyPhD for Gibson deletion, @JGarciaNafria for IVA cloning and anyone else I missed because the Twitter notification system is chaos personified.
What reagents do I use?
I am not sponsored by any of these companies. I just can confidently say their products work.
- NEB HiFi master mix - Cat# E2621
- NEB Q5 any will work, we use 2x hot-start master mix - Cat# M0494
- NEB Monarch Gel Extraction - Cat# T1020
- Thermo Fisher SybrGreen - Cat# S7563